Pages

Merry Christmas!

Just wanted to wish everyone a very merry Christmas, or whatever holiday you celebrate!

I've been in Missouri visiting family over winter break. Gotta love it!

I have several posts in the works, but didn't bring my computer with me, so they'll have to wait til I get back home in Tallahassee.

Vanillekipferln: German Almond Crescent Cookies


I'm here to let you in on a little secret of mine.

Are you ready?

Are you SUUUURE?

Ok..

I make the best cookies ever.

Ok, that might be a bit of an overstatement. But seriously these cookies are so good. They're requested every Christmas by all the family, and sometimes I make them throughout the year just for myself!

They're an old German recipe, often made during the Holidays. I used to make them to sell for the German Club before things went to sh*t there. Anyway they're seriously tasty. Of course, anything this delicious isnt exactly the most healthy, but hey, its Christmastime, who's keeping track? ;)

What You'll Need:

  • 1 cup Butter, room temp
  • 2/3 cup Sugar
  • 1 tsp Vanilla extract
  • 1 1/2 tsp Almond extract
  • 2 1/2 cups Flour
  • ~ 1 cup Almonds (slivered work best)
  • Powdered / Confectioners Sugar (for dusting)
  • Food processor (optional)
  • A large bowl
  • Mixer (optional, I've done it by hand with a fork before)
Now please note in the photos of the preparation, I made a TRIPLE recipe of these because I wanted to have enough to go around. (Thats how good these things are!) They already make a fairly large batch, so just be aware. Alright then, on we go..


First things first, the almonds. Now I know the ingredients says 1 cup, but a little extra definitely wont hurt. I usually just get these 1 1/3 cup bags and use the whole bag. (In this case, I had a 1 1/3 cup bag and a 1 2/3 cup bag, giving me 3 cups for 3 batches.)

Grind them up fairly small in a food processor. Now, back when I lived in a dorm and didnt have a food processor, I just smashed the almonds by hand and that worked fine, the dough was just very crumbly. So whatever works.


Add your 1 cup of butter (yes, that is a lot of butter) and 2/3 cup of sugar in the bowl and cream them together. The mixture should get fairly fluffy, but not overly so or you'll end up with very crumbly cookies.


Then add a tablespoon of vanilla extract, and a tablespoon and a half of almond extract. Mix these in well. Starting to smell good, huh!!


At this point I realized I needed a much bigger bowl if my triple batch was going to fit...


Ok, now this part can be a little difficult. Add the 2 1/2 cups of flour and the chopped up almonds and mix it all together as best as you can. It might be too tough for a mixer (mine definitely couldnt handle it, but yours might be higher quality..)


The dough you end up with will be crumbly, but the butter should hold it together nicely when you go to shape it. If seems too sticky, add a little more flour.


It would be around this time I would suggest preheating the oven to 350.

And here comes the fun part; time to get messy!

Take about a tablespoon or so of the dough. Roll it into a ball, making sure to squish it so it holds together nicely. Yes, you're going to get greasy.


Now take that ball and roll it between your hands to make a log shape. It should be about 2 inches long and about 1/2 inch thick. Gently fold that log into a crescent shape, as shown.


Lay those puppies out on a slightly greased cookie sheet. They dont spread a whole lot. but try and leave some space between them. The ones I have below are probably a little too close together, but I was trying to fit as many as I could since I was making such a huge batch.


Pop those puppies in the oven for about 15-20 minutes, or until edges are golden brown. They're not going to brown too much unless they're burnt, but they'll be darker than the dough.

I didnt get a photo of them out of the oven, so you'll have to use your imagination on this one. Put them on a cooling rack for a while until cool to the touch. Sometimes I leave them a little warm still so the powdered sugar sticks better, but its really up to you.

Roll the cooled cookies in powdered sugar. Eat the broken ones. This part is mandatory. There will be no sub-standard cookies here.

Aaaand they're done! Give them out to all your friends and relatives, they're sure to delight. OR just eat them all yourself, I've done that one too!

DIY T-Shirt Bracelet #2


So I promised in my last post that I'd talk about the other version of the t-shirt bracelets I made next time. Well that was like 2 weeks ago, and I'm finally getting around to doing just that! Things have been hectic around here with Finals week coming up and such so I havent really had the time.

If you want to read about how I made the first version, you can do so here.

So lets get started on the loopy version 2! (Ignore my terribly chipped nails please! I'm way too impatient to ever let them dry all the way and they ALWAYS get messed up!!)


I used the same sort of strips in this one as the last one. Take your old t-shirt and cut off the bottom hem. Then cut strips about 1/2 - 1 inch wide across the bottom. I cut these at one side so they would be one long strip instead of a circle. Then grab both ends and stretch the strip out to make it longer and sort of curl up. My strips ended up being about 4 ft. long. You can see one in the photo below.


Now you're going to want to make a small hole in one end of the strip. Just fold over the very tip and cut a small snip on the fold.


Take the un-snipped end and feed it through the snipped end to make a loop. Pull the end though the hole until you have about 4-5 inches out.


Now just coil up the remainder of the loop by twisting/folding so it is a bunch of loops laying on top of eachother. The number of times you can do this depends on the length of your strip and how big around it needs to be to slide it over your hand and to your wrist. Remember the fabric will stretch some, so dont worry too much about it fitting over your hand, just make it the tightness you want it to lay on your wrist.


Now you're going to take the excess fabric you pulled through and wrap it around the loops to hold it all together. Start off a little bit away from the base of where your excess goes through the hole, then wrap towards the base until you have the end of the side with the hole completely covered. Leave a little bit of the end unwrapped. About 1 - 1.5 inch will do. You might want to give the loops a bit of a twist here so they hold together a little better in the finished product. Unless you want it to look like all separate strands, in which case, dont! Itall depends on what you want it to look like!


 Find the needle with the biggest hole you have. Feed the end of your unwrapped fabric through this hole like you would thread. (This is where that big hole come in handy.)


Now you're going to secure the end by pushing the needle through the coils of itself where it is wrapped around, and pull it through. Be careful to only go under the coils, but not stab through any of the fabric, because then your strip wont fit!


Pull it pretty tight and snip off the extra fabric.


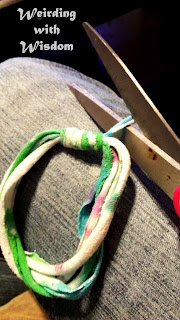
And now you're done! The finished product should look something like mine below. You can kind of see how I had twisted the strands together so they wouldnt flap apart in the earlier step. If you want to extra secure where it is held together, put a dab of hot glue on the end. Depending on how tightly you wrapped it around you may or may not need this.


Here it is paired with the braided version I did in the first post!


For reference, my boyfriend got the one I made for him very dirty at a construction job. Since it was made of t-shirt material, I figured I could just pop it in the wash along with laundry and it would be fine. Good news: both versions held up great after going through the wash. So if you ever need to clean yours, just throw it in the laundry!

I'd love to hear about and see any versions you make! If you have any other suggestions for what I can do with the rest of my t-shirt, please let me know! I love feedback!

DIY T-Shirt Bracelet #1


Alright, this will be my first post that I've really worked to edit the pictures I'm using. I was also sure to photograph every step along the way so I could write the tutorial for this one. I think I'm starting to get the hang of this blogging thing!!

I've seen tons of these t-shirt bracelets around the web, and I wanted to try to do some of my own. I had this old t-shirt that I've been meaning to do something with, and it seemed like the perfect opportunity! The shirt was a white t-shirt that I had tie-dyed a few years back, then developed holes and was just un-wearable.

This is the braided version of the t-shirt bracelet I made. If you'd like to see the other version, you can do so here.


I had already started cutting it up by the time I took this picture, but you can see what I've done. First, I cut the bottom hem off. Then I used my rotary cutter and made strips that were about 1/2 - 1 inch wide across the bottom of the shirt. I cut these at the side so they would be a long strip instead of a circle. Then I stretched the strips out to make them curl more. Below is one of the strips all stretched out. They were about 4 ft long, which is about how long yours should be if you're going to try to make them how I did. If yours are shorter, you will have to connect your strips somehow.


The first sort I made was the braided one shown in the photo at the top of the page. I took two of the strips and matched up the ends, then folded them both in half.


Then I turned it around to get to the loopy bit. Now you'll need to have some way to hold the strips here and keep a small portion of the loop. I just grabbed a hair clip. Now you should have 4 strands hanging down, two on each side. Since my fabric strips were tie-dye, it didnt really matter how I had them arranged. You could do this using two different colors or something though, in which case you might want to have both of the same color on the same side. Or mix them up to give it a different look. Its up to you!


Now comes the fun part. First, cross the two strands that are on the right, over the strands that are on the left. Look them UNDER the left strands and then back OVER the right ones. The photos probably explain it better than I can do it in words.


Then pull it tight, and repeat for the other side, crossing the left strands over and around the right strands.


Keep doing this, alternating sides, until you have a chain long enough to go around your wrist. Keep in mind that it WILL stretch, sometimes a lot depending on the type of fabric you're using, so try wrapping it around your wrist every now and then to test it.


Now you're going to tie the ends together to close it off. Now this part can be kind of tricky, and I dont really have any right or wrong way to suggest doing this. I'm sure I did it totally differently for the couple I made. Just find some way to tie the loose ends you're left with to the loop at the other end.


I dont have a photo of this part, but then just cut off the extra length of the strands. I actually went even further as to hot glue the ends of the strands down to re-enforce the tie and ensure it wouldnt unravel. Depending on how well you tied them off, this step is optional.

And thats all there is to it! Enjoy your new bracelet! I love that they're soft and dont clank around like most bracelets.


I actually had lots of these strips from the shirt (and quite a lot of the shirt left-over!). With the excess strips, I tried out another version of the t-shirt bracelet as well. I'll post a tutorial for that one next time! If you use my tutorial, please link up to this post!

If you try this out, leave a comment to let me know how it goes. I'd love to see pictures of your creations! This bracelet has endless possibilities with different sorts of fabric, different color combinations, ect!

If you have any suggestions for what to do with the rest of the t-shirt fabric, please leave a comment!

Happy (Belated) Halloween!!

Image courtesy of [digitalart] / FreeDigitalPhotos.net
Hope everyone had a great Halloween! Its one of my favorite holidays. I didnt really get to decorate this year because my roommates dont share my love for the holiday, which was really sad. Plus I dont really live in an area that gets trick-or-treaters. However, to make up for it, I did something I've always wanted to do. I made my own costume!


This guy to the left here, this is Link, from the Legend of Zelda franchise. He was my inspiration for this costume. LoZ has always been my absolute favorite video game franchise, so I decided to honor it this year by going as Link.

And this blue ball with wings to the right? Thats Navi, Link's fairy companion. I decided that my boyfriend would go as her to complete the image. :)


Break out the trunk-o-junk, my crammed full, completely unorganized crafting supplies storage!


To start off, I got this XXL green t-shirt for like $5. I'd use this as the base for the costume.


 I laid a dress and t-shirt that had similar fit to what I wanted down on top of the shirt to see how it would be laid out.


 I traced the outline of the dress/shirt with chalk and removed them. I actually traced about 1/2 an inch outside the clothes to leave seam allowances.


Then I cut it out! I cut through both sides using a rotary cutter. I left the bottom hem intact and most of the top edge.


Patches was super helpful, as usual.


Then I cut the neckline. This part I had some issues with. I started out trying to make a neckline like you can see in the image of Link back there at the top, which was sort of squared off with a V in the middle. Well, I cut too far and it was no longer fitting properly. So I had to take another bit of extra fabric that had been cut off earlier and sewed the whole thing on where I had cut off before. I decided to make that side the back so that it wouldnt be so obvious, and just made the back, now the front, into a simple V.


I turned it inside out, sewed up the side-seams, and closed off the bit of the sleeves that was left open. I also hemmed the sleeves because they werent looking quite right as is. Of course, I managed to sew one of them the wrong way out, and had to rip the seams and re-do it.

Hey, these things happen!


I took the leftover bit from the shirt, you can see the sleeve here, to make the hat. It was pretty easy, where the little triangular bit coming off the top of the sleeve is I just sewed that down, and closed up the whole other side, making it taper down to a point at the bottom. The end result is in the photo below. It wasnt perfect, but it would do without having to buy more fabric.

Luckily, the hole of the sleeve fit my head perfectly!


And then it was time to accessorize! Specifically, accessorize for cheap! You can see to the left the iconic Hylian Shield that Link carries to battle, and I wanted to capture the feel of that. However, these things are very expensive if you're going for cosplay quality.

Well, I wasnt going for cosplay quality. I made my Hylian shield out of cardboard. Then I cut the shape out of printer paper and drew on the design. As for holding it, I wanted to keep it simple. I just hot-glued another bit of cardboard to the back so it would fit in my hand.


I had two brown belts to use like Link has, one around my waist, and one around my back. They also functioned to make the rather bland green tunic/dress a bit more interesting. I didnt have a sword to strap to the belt around my back, but it worked anyway. Then I threw on some white sweatpants and my black (would have preferred brown, but black is what I had) boots and was ready to go! I also had some brown leather gloves I planned on wearing, but I ended up forgetting them when I left for the party. It was a bit too warm out for them anyway.


The boyfriend's costume was much simpler in some ways, and more complex in others. It actually probably took me the longest out of everything else, but it wasnt exceedingly complicated. I drew some wings roughly the same shape as Navi's, with two bigger ones on top and smaller ones on bottom. Then I traced these out onto printer paper and colored them light blue with colored pencil. I did 8 total, for each side of each wing. Since the top parts were larger than the paper, I had to do it in pieces. It worked out OK though, you cant even really see the seams in the picture I took, so they must not have been too noticeable. Then I glued all the paper bits onto their respective sides of the wings.

Then I cut out a little square of cardboard and hot-glued the wings to it in the proper shape. To keep it on him, I hot-glued some elastic straps to the "inside" of the cardboard square. He just wore a blue-ish shirt and blue-jeans to complete the look. (Tried to convince him to let me spray his hair blue, but he wasnt going for it. Loser!)

 And here it is all put together! The boyfriend's making quite the face.. You'd almost think he didnt like being a little blue fairy! Humph. But he played along for my sake. :)


What did you do for Halloween? Make any cool costumes? Or fun Halloween-y recipes or decorations? Please share, I'd love to hear about it!